Configure SSL-VPN Access with 2FA via Email on Fortigate with FortiAuthenticator
Preface
In today’s remote-first world, securing access to your network infrastructure is more critical than ever. One popular solution is using SSL-VPN on FortiGate firewalls, which provides encrypted access to internal resources over the internet. However, ensuring that this access remains secure and properly authenticated is key to protecting your environment from unauthorized users.
We will walk through the steps to set up SSL-VPN access on FortiGate using FortiAuthenticator for authentication management. With FortiAuthenticator, you can easily integrate two-factor authentication (2FA) and centralized user management, adding an additional layer of security to your VPN access. Whether you’re new to Fortinet solutions or looking to strengthen your existing setup, this guide will help you implement a robust, secure SSL-VPN solution.
Prerequisite
- Access to the Fortigate Device/VM;
- Access to the FortiAuthenticator Device/VM;
- The following information about the user we about to create:
- the username;
- Email address;
- Where they need access to.
Procedure
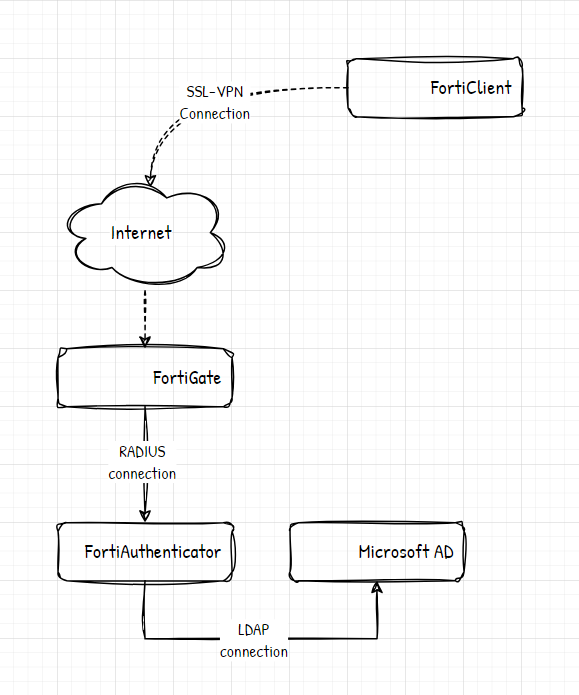
Topology

Create the User in FortiAuthenticator
- Login to FortiAuthenticator;
- Open Authentication → User Management → Local Users menu;
- Select Create New button in upper-left corner;
- Fill the
Username; - For the password, in
Password creation, select specify a password and enter your desired password; - Enable
Allow RADIUS authentication; - Disable
Force password change on next logon; - For
Role, selectUser; - Check the configuration again, and then click
Save.
After the entry is initialized, the page will be reloaded and more options to fill will appear. You can continute the process:
- Enable
One-Time Password (OTP) authentication, and then:- For
Deliver token codes from, selectFortiAuthenticator; - For
Deliver token code by, selectEmail.
- For
- For
User Informationpart, fill with as much information as you can; - Make sure the
Emailpart is valid, because this will be used for 2FA; - For
Password REcovery Options, enableEmail recovery; - For
RADIUS Attributes, select+ Add RADIUS Attributes, and then:- For
Vendor, selectFortinet; - For
Attribute ID, selectFortinet-Group-Name; - For
Value; fill with the group name you need. Note the group name, because this will be used again in the Fortigate.
- For
- Check the whole configuration again, and then select
Save.
The user is now created, but we still need to change the user password to the randomized one. To do that:
- select the user you just ceated from the list of users, and then in
Password AuthenticationselectChange Password.- In
Password creation, selectSet and email a random password. - Click
Save.
- In
The user configuration is now done.
Create and Configure User Group in FortiGate
- Login to Fortigate;
- Open User & Authentication → User Group menu;
- Select Create New button in upper-left corner;
- For
Name, fill with the same group name as in the RADIUS attribute in FortiAuthenticator; - For
Type, selectFirewall; - Keep the
Memberspart empty, because we will take the users from FortiAuthenticator; - In
Remote Grouppart, select the+ Addbutton; - Select the RADIUS server that is pointed towards FortiAuthenticator;
- In
Groupspart, selectSpecify, and then entry the previous group name again in the form; - Select
OKbutton.
At this point, the group is already setup, but you still need to map the user group into a VPN Portal.
- Open
VPN -> SSL-VPN Settingsmenu; - Scroll to the
Authentication/Portal Mappingpart in the bottom; - Select the appropriate portal, and then in the opened sidebar, in
Users/Groupsform add the groups you just created; - Select
OK.
Create and Configure Policy in Fortigate
- Open Policy & Objects → Firewall Policy menu;
- Select
+ Create Newbutton in upper left corner; - Configure the new policy:
- For
Name, create a descriptive name, likeVPN GroupA -> ServerA; - For
Incoming Interface, selectSSL-VPN tunnel interface (ssl.root); - For
Outgoing Interface, select the outgoing interface according to the routing table of the destination IP Address; - For
Source, in the opened sidebar:- In
Addresstab, select SSL-VPN user IP Pool; - In
Usertab, select the User Group you just created.
- In
- For
Destination, in the opened sidebar, select/create the destination IP address; - For
Service, select/create the needed Services/Port. Be as specific as possible; - For Inspection Mode, select
Flow-based; - Disable
NATexcept if you’re configuring outgoing connection to the Internet; - For
Security Profiles, select the following:- Enable
AntiVirus, selectav-block; - Enable
Application Control, selectblock-high-risk; - Enable
IPS, selecthigh-security; - For
SSL Inspection, selectcertificate-inspection.
- Enable
- In
Logging Options:- Enable
Log Allowed Trafficand selectAll Sessions; - Disable
Generate Logs when Session Starts; - Disable
Capture Packets;
- Enable
- Add
Commentsif you want; - Enable
Enable this policy. - Click
OK.
- For
Conclusion
Setting up SSL-VPN on FortiGate with FortiAuthenticator adds a strong layer of security by using centralized user management and two-factor authentication. This helps ensure that only the right people have access to your network, reducing the risk of unauthorized access.
With FortiAuthenticator, managing and securing VPN access becomes easier and more effective. By following this guide, you can build a secure and reliable VPN setup that protects your network while keeping things simple for users.