Adding New Local HTPASSWD User in Openshift Container Platform (OCP) Cluster
Preface
In case you didn’t have SSO setup yet, here’s some simple (questionable) way to create local users to access OCP Cluster using OCP Client CLI or OCP Console using htpasswd.
Prerequisite
- You have access to the cluster via CLI;
- Preferably you’re accessing from Linux/MacOS.
Instructions
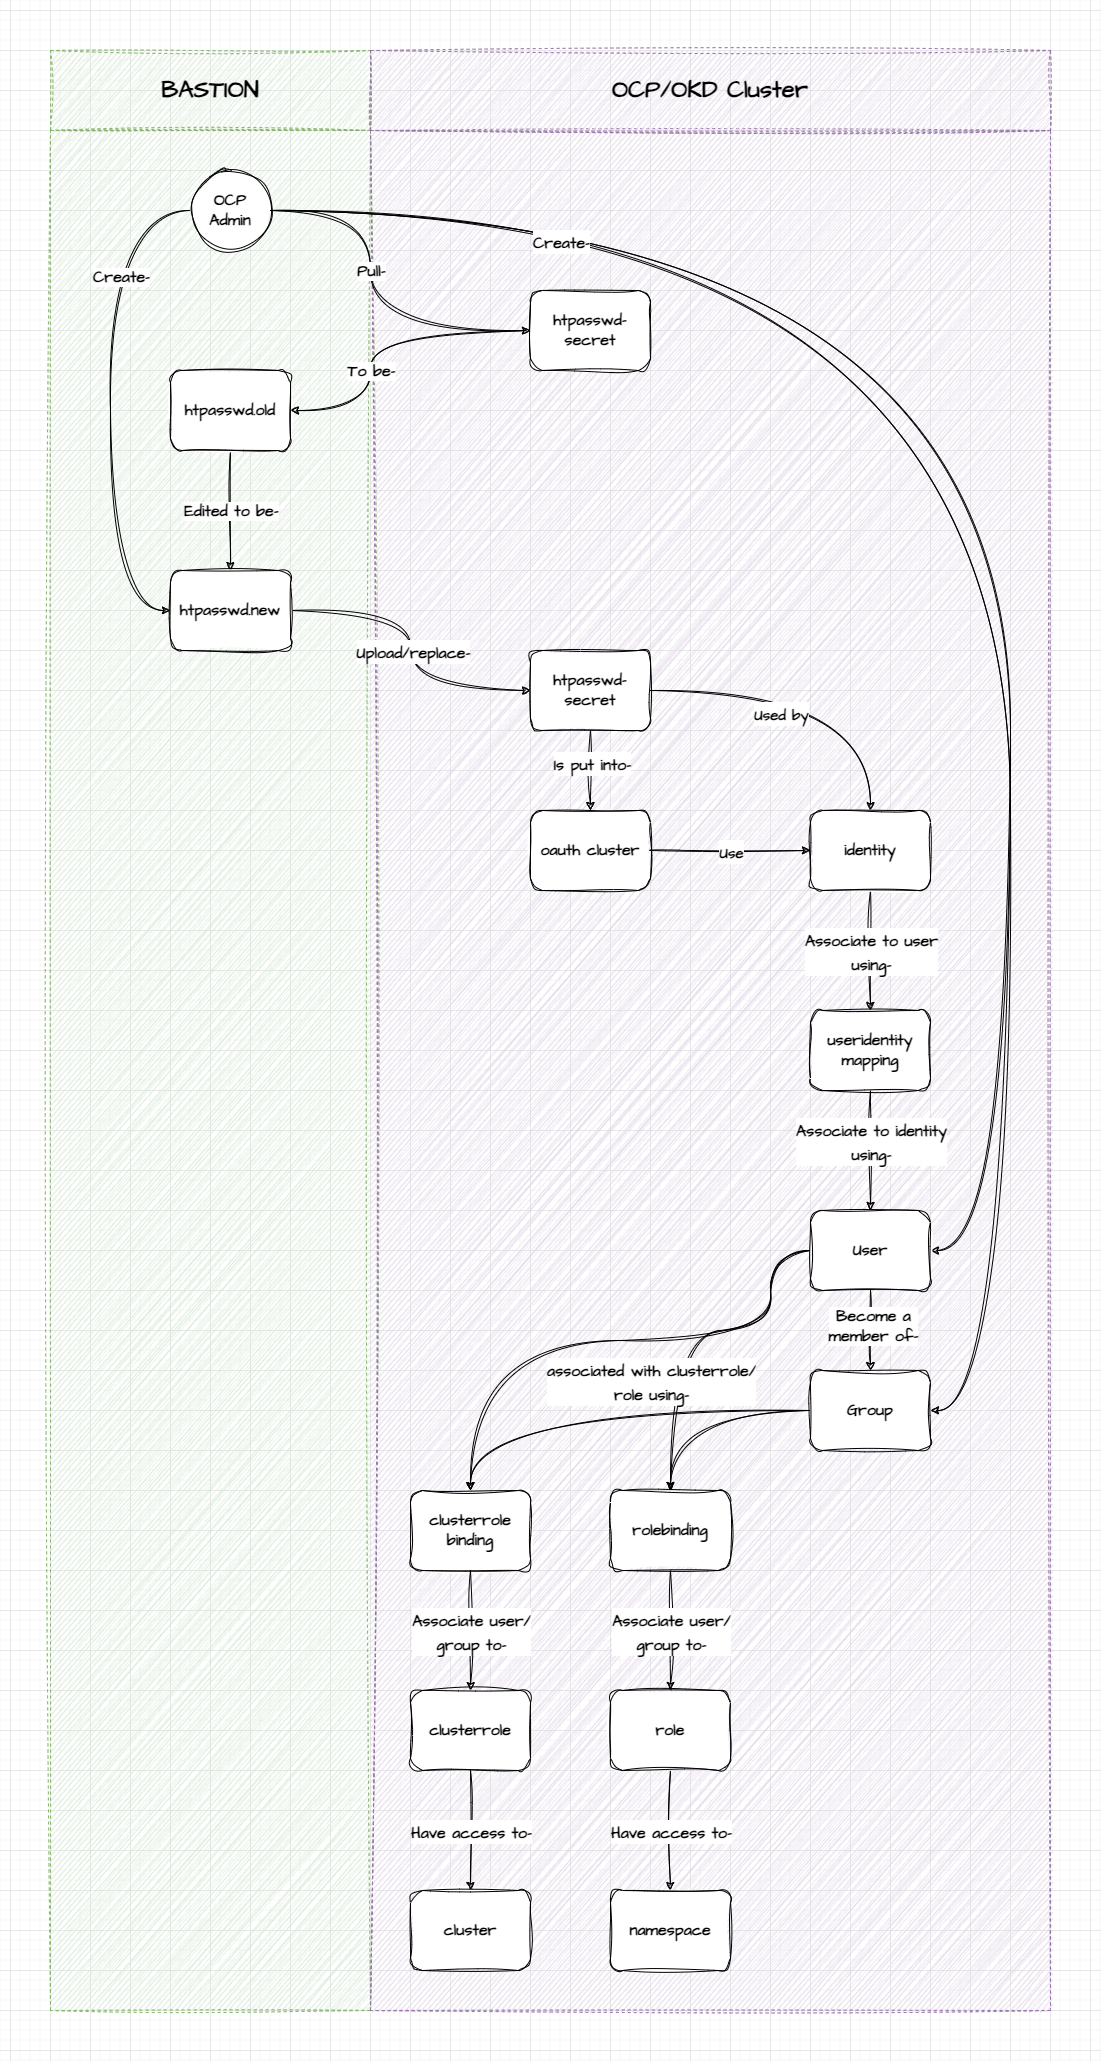
Relationship Map Between Resources
Find Out Identity Provider Name
oc get oauth cluster -o yamlOutput example:
apiVersion: config.openshift.io/v1
kind: OAuth
metadata:
  annotations:
    include.release.openshift.io/ibm-cloud-managed: "true"
    include.release.openshift.io/self-managed-high-availability: "true"
    include.release.openshift.io/single-node-developer: "true"
    release.openshift.io/create-only: "true"
  creationTimestamp: "2023-11-22T09:14:41Z"
  generation: 3
  name: cluster
  ownerReferences:
  - apiVersion: config.openshift.io/v1
    kind: ClusterVersion
    name: version
    uid: 6279f880-70d2-45d9-945f-3d68a36ab8f6
  resourceVersion: "43085746"
  uid: 59d845af-1af7-4d5c-9f85-9bfd68ce06bf
spec:
  identityProviders:
  - htpasswd:
      fileData:
        name: htpass-secret <------------------- this is IDP SECRET NAME
    mappingMethod: claim
    name: Local User <-------------------- this is IDP NAME
    type: HTPasswd
Things you should note is the identityProvider name (in above example, Local User) and the secret it uses (in above example, htpass-secret).
Update HTPASSWD File
Pull the htpasswd file to your local
You can pull the htpasswd file to your local as users.htpasswd with the following command:
oc get secret <IDP-SECRET-NAME> -ojsonpath={.data.htpasswd} -n openshift-config | base64 --decode > users.htpasswdCheck the current content of the htpasswd file:
cat users.htpasswdFor additional measure, you can backup the file first in case anything goes wrong.
cp users.htpasswd users.htpasswd.backupCaution
Make sure you pull (and later push) the correct htpasswd file, especially if you use single htpasswd file for all credentials. You surely don’t want to lose your access to the cluster.
Update the htpasswd file
After you pull the htpasswd file to your local, you can update it to include the new username:password credential to be used by your new user. The following command should update the users.htpasswd file to include the new user, with a prompt that asks you what their password would be.
htpasswd -B users.htpasswd <NEW-USERNAME>If you do something wrong, you can delete the user you just created using this command:
htpasswd -D users.htpasswd <NEW-USERNAME>Check the current file content of the htpasswd file to make sure you don’t mess things up.
cat users.htpasswdReplace the htpasswd secret with the updated file
oc create secret generic <IDP-SCRET-NAME> --from-file=htpasswd=users.htpasswd --dry-run=client -o yaml -n openshift-config | oc replace -f -The above command should replace the existing secret in the cluster using your updated one.
Create Cluster User
Create the new user resource for the Cluster
oc create user <NEW-USERNAME>Create new identity
oc create identity <IDP-NAME>:<NEW-USERNAME>For example:
oc create identity "Local User":new_userCreate useridentitymapping to map user to identity
oc create useridentitymapping <IDP-NAME>:<NEW-USERNAME> <NEW-USERNAME>Assign Role to the User
At this point, your new user and credential is basically already exists in the cluster, but they don’t really have any access yet. You could decide for whether they could access the whole cluster (as in a new cluster admin) or they should be limited to certain namespaces/projects only.
Assigning User to ClusterRole
If you want the new user to be able to access the whole Cluster, you need to use the ClusterRoleBinding to assign the user to a ClusterRole. For example, if you want to create new administrator user, you can use the following command:
oc create clusterrolebinding <NEW-CLUSTERROLEBINDING-NAME> --clusterrole=cluster-admin --user=<NEW-USERNAME>
Assigning User to Role
If you want the user to access certain namespaces only, you can assign the user to a namespace-level Role using RoleBinding.
Note
Make sure the role is already exists firsts in the namespace.
For example, if you want to assign the user to a namespace-level Role named viewer:
oc create rolebinding <NEW-ROLEBINDING-NAME> --role=viewer --user=<NEW-USERNAME> -n <NAMESPACE-NAME>
Conclusion
At this point you should be able to use the new user to access the Cluster from the CLI or Console.