This post provides a step-by-step guide for installing a Kubernetes cluster using Talos Linux. Talos is a modern, secure, and minimal operating system designed specifically for Kubernetes. By following this guide, you’ll gain an understanding of the configuration, installation, and management of Kubernetes on Talos, making it an ideal foundation for building highly resilient and scalable clusters in our infrastructure.
Prerequisite
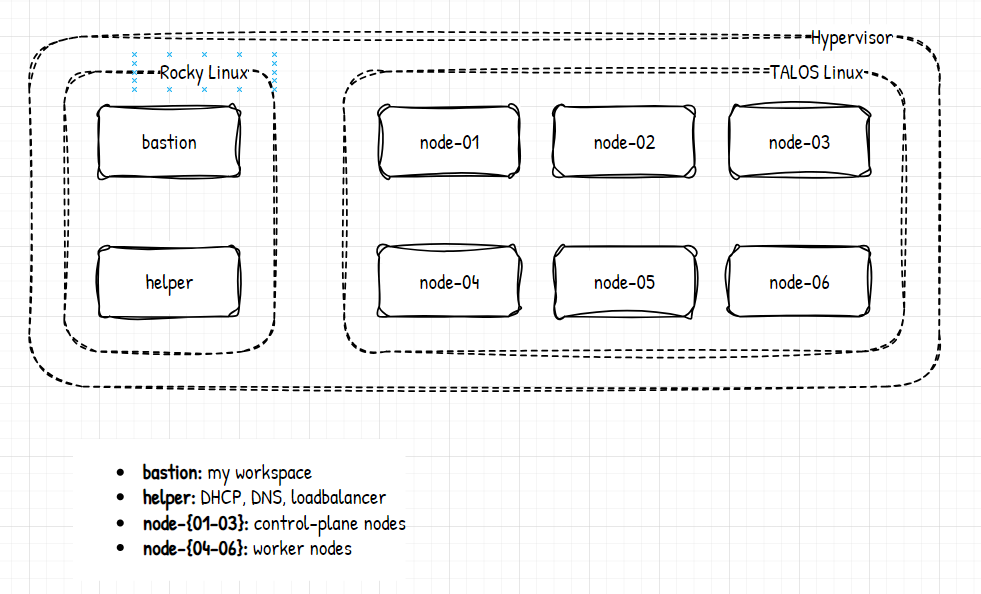
A Linux workstation that works as jumphost/bastion;
Some baremetal/hypervisor-ready server.
For reference, the machines I prepare looks like this diagram:
Procedure
(Optional) DHCP Server
For DHCP Servers, you can actually use your existing DHCP servers (either standalone or the ones you usually get from routers). But this time I’m using dnsmasq as DHCP server.
Installing dnsmasq
Using dnf:
sudo dnf install dnsmasq -y
Configuring dnsmasq
Set dnsmasq to listen to your desired IP address or interface by editing the /etc/dnsmasq.conf file, and uncomment and edit the listen-address or interface part as you need;
Since I’m using dnsmasq only for DHCP (I’m using bind for DNS server later), I also add port=0 to the /etc/dnsmasq.conf;
Create a DHCP configuration by adding new file in /etc/dnsmasq.d. In this case, I created /etc/dnsmasq.d/01-dhcp.conf file with the following configuration:
# set as authoritative modedhcp-authoritative# make DHCP clients receive IP address sequentiallydhcp-sequential-ip# set dhcp-range to be between 10.1.108.221-254, with the subnet of /24, leased for 6 hoursdhcp-range=10.1.108.241,10.1.108.254,255.255.255.0,6h# set the default gateway of DHCP client to be 10.1.108.1dhcp-option=3,10.1.108.1# set the DNS server of DHCP client to be 10.1.108.2dhcp-option=6,10.1.108.2# DHP reservations for k8s-dev.ndk.my.id nodes# node-01dhcp-host=00:0c:29:a7:7c:b1,node-01.k8s-dev.ndk.my.id,10.1.108.221,infinite# node-02dhcp-host=00:0c:29:d6:70:bd,node-02.k8s-dev.ndk.my.id,10.1.108.222,infinite# node-03dhcp-host=00:0c:29:8a:e0:6b,node-03.k8s-dev.ndk.my.id,10.1.108.223,infinite# node-04dhcp-host=00:0c:29:4b:1f:af,node-04.k8s-dev.ndk.my.id,10.1.108.224,infinite# node-05dhcp-host=00:0c:29:9c:36:14,node-05.k8s-dev.ndk.my.id,10.1.108.225,infinite# node-06dhcp-host=00:0c:29:df:d0:00,node-06.k8s-dev.ndk.my.id,10.1.108.226,infinite
You can use your existing DNS servers if you want to, but in this case I’m installing BIND9 on the same server.
Installing bind
Using dnf:
sudo dnf install bind dnsutils
Configuring bind
Edit the configuration in /etc/named.conf ass follows:
add your machine IP address in listen-on port 53;
add the subnet you want to allow to use this machine as authoritative DNS server in allow-query;
add the subnet you want to allow to use this machine as recursive DNS server in allow-recursion;
add DNS Forwarders in forwarders.
Adding DNS Zones
Add the zones in the /etc/named.conf directly, or if in /etc/named.conf there’s a line like include /etc/named.rfc1912.zones, you can also add the zone in that file too. Add the following:
zone "k8s-dev.ndk.my.id" { type master; file "/var/named/k8s-dev.ndk.my.id.zone"; allow-query { any; }; allow-transfer { none; };}
And then add the zone config in the /var/named/k8s-dev.ndk.my.id.zone file:
$TTL 60M;;@ IN SOA ns.k8s-dev.ndk.my.id it.dctn.asdp.id. ( 2024092000 ; serial 3H ; refresh (3 hours) 30M ; retry (30 minutes) 2W ; expiry (2 weeks) 1W ) ; minimum (1 week) IN NS ns.k8s-dev.ndk.my.id.;;ns IN A 10.1.108.2;api IN A 10.1.108.210api-int IN A 10.1.108.210;*.apps IN A 10.1.108.211;node-01 IN A 10.1.108.221node-02 IN A 10.1.108.222node-03 IN A 10.1.108.223node-04 IN A 10.1.108.224node-05 IN A 10.1.108.225node-06 IN A 10.1.108.226;lb-dns-01 IN A 10.1.108.3lb-dns-02 IN A 10.1.108.4;bastion IN A 10.1.108.200
Running bind
sudo systemctl enable named --now
(Optional) Load Balancer
You can actually just point your api endpoint domain name to one of the master nodes if you want, but for production-ready cluster, it is really recommended to use (high-availability) load balancer. For this case I’m using haproxy.
Installing haproxy
Using dnf:
sudo dnf install haproxy
Configuring haproxy
Add file in /etc/haproxy/conf.d/. In my case, I created a file named 01-k8s-apiserver.cfg, with the following content:
If you’re having permission problem while binding to socket, you probably need to allow haproxy_connect_any in SELinux configuration (reference). Run the following command:
setsebool -P haproxy_connect_any=1
Installing talosctl
Via convenient script:
curl -sL https://talos.dev/install | sh
Generate Talos Configuration
talosctl gen config {cluster-name} {cluster-endpoint}
For example:
taloscl gen config k8s-dev.ndk.my.id https://api.k8s-dev.ndk.my.id:6443
Expected output:
[ndkprd@bastion k8s-talos]$ talosctl gen config k8s-dev.ndk.my.id https://api.k8s-dev.ndk.my.id:6443generating PKI and tokensCreated /home/ndkprd/k8s-talos/controlplane.yamlCreated /home/ndkprd/k8s-talos/worker.yamlCreated /home/ndkprd/k8s-talos/talosconfig
Optionally, you can also move/copy the talosconfig to default location so you don’t need to explicitly calling the talosconfig file with flag every time:
cp ./talosconfig ~/.talos/config
NOTE
If you’re not doing this, you need to pass --talosconfig ./talosconfig flag for your every talosctl command when concerning this cluster.
Apply Nodes Configuration
You can modify the controlplane.yaml and worker.yaml if you want to, but most of the time it works as is. For example, if you want to change some cluster configuration (like pod and service subnets), you can change it from the controlplane.yaml. You can also patch the file and create unique config file for each nodes if you want to, like for example if you want to set the hostname from here.
If you’re not doing this, you need to pass --e 10.1.108.221 10.1.108.222 10.1.108.223 (or at least one of them) flag for your every talosctl command when concerning this cluster.
Bootstrapping the K8S Cluster
talosctl bootstrap --nodes 10.1.108.221
CAUTION
Quoting the Talos docs, “The bootstrap operation should only be called ONCE and only on a SINGLE control plane node”.
Accessing the K8S Cluster
To export the kubeconfig, you can use one of this:
# merge with existing ~/.kube/configtalosctl kubeconfig -n 10.1.108.221
# export to its own filetalosctl kubeconfig -n 10.1.108.221 <file-name>
If you’re using the later option, make sure you either do EXPORT kubeconfig=<file-name> towards your kubeconfig file, or move/replace the file in ~/.kube/config.
At this point, you should be able to access your K8S Cluster. Test it out:
kubectl get nodes
Conclusion
In conclusion, setting up a Kubernetes cluster with Talos Linux provides a streamlined, secure, and immutable environment for managing containerized workloads. By following the steps outlined in this guide, you’ve successfully installed and configured a Talos-based Kubernetes cluster. This setup not only enhances security but also simplifies cluster management with Talos’ API-driven approach. As you move forward, continue to leverage Talos’ declarative configuration model to manage updates and scaling, ensuring the cluster remains stable and efficient for production workloads.